 |
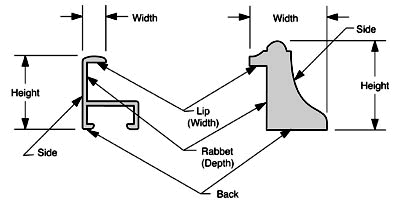
Figure 1 — Common frame terminology |
Matless pastel framing is a method of framing that has proven to be quite popular with many pastel artists. It allows pastel artists to treat their paintings more like oil or acrylic paintings that are rarely matted.
Matless framing may not always be appropriate for every painting and it certainly is not the only method that I would recommend.
Several problems are avoided by doing matless framing. The first and most obvious is that you can avoid the search for the matching color matboard. The use of pH neutral “Acid-Free” matboard further limits the color selection and increases the cost. Third is the expense involved in having mats cut for you professionally. In addition, one can avoid the white bevel of cut mats that sometimes conflicts with the colors of pastels.
Unless you have the proper mat cutting equipment, the process can be very difficult and frustrating. Making mistakes when cutting your own mats can also be expensive.
There are several methods of creating matless frame jobs. Making your own matless frames with strips of mat, foam board, or wood can be time consuming, exacting, and tedious. The easiest of course is using one of the commercially available spacers.
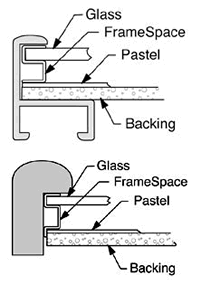
How FrameSpace® works:
FrameSpace® is designed to grip over the edge of the glass in a frame for mechanical permanence. There are no messy glues, adhesives, or tapes involved. FrameSpace works with the industry standard 1/8 inch “Allowance” – the difference between the glass size and the frame size. Cut it easily “on the glass” using the glass as a gage for proper length. It is recommend using sharp garden shears called “Anvil Pruners” – no measuring or marking. FrameSpace is available in 10 sizes from 1/8 inch airspace up to 3/4 inch airspace, most in clear, black, or white.
“Peel & Stick” type spacers:
EconoSpace® is designed to stick to the edge of the glass with a peel and stick pressure sensitive adhesive. This type of spacer is not a permanent installation and should only be used on smaller frames. The glass must be cut larger (or the frame cut smaller) so that the glass doesn’t move back and forth so much in the frame. I recommend a maximum of 1/16 inch allowance on most frames when using this style spacer. The EconoSpace® must be adhered flush with the edge of the glass to get maximum adhesive contact. Do not stick it to the inside of the frame as the resins in the wood will degrade the adhesive. You can also cut the Econospace® with the same shears or a razor blade.
Homemade spacers:
The top drawing in Figure 4 shows a method using a strip of colored mat board laminated to a layer of foam board that is then bonded to the frame rabbet. When making your own spacers this way, don’t be tempted to use double sided tape as it is not permanent. The resin in wood frames reacts with the tape and will make it fail. Making the laminations and bonding the spacers into the frame must be done with glue. Mat board strips expand and contract with changes in humidity and will likely make the spacers bow. This process is exacting, messy, and not easily removable to clean or replace the glass.
The bottom drawing figure 4 shows a wood spacer that would normally be painted or stained appropriately and then bonded to the rabbet. Caution: Wood against art is a not recommended as the resins in the wood will “burn” the paper. This method is also not easily removable to clean or replace the glass.
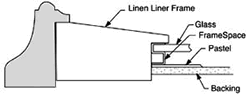
Sometimes a linen frame liner (figure 5) is used in conjunction with spacers to create another attractive look in pastel framing. This is a more expensive choice but may be just perfect for that special painting. The glass and spacer must go under the lip of the linen liner. I usually spray the linen liner with Scotchguard® by 3M to help keep it somewhat clean.
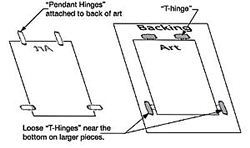
Attaching the art in matless frames is quite simple on smaller pieces. Don’t attach it! It’s not going anywhere. On larger pieces, hinge the art over the top of the backing in 2 or 3 places to suspend the art. If you just stand the art on edge in the frame, the weight of the paper over time will make it belly out near the bottom. Not good.
If you won’t do this, at least don’t use pressure sensitive adhesive hinge tapes or double-sided tape as they are generally neither permanent nor easily reversible.
I would recommend against using linen hinges for hinging art. Linen hinges are for hinging front mats to the back mats, not for hinging paper art. The hinge must be the weak link so the hinge should tear, not the art. Linen hinges are way too strong and are hardly reversible without ruining the art. It takes too much water to reverse the adhesive. Some of the pressure sensitive hinging adhesives are not reversible with water but require solvents. Often the sharp edges of the hinge will show from the front of the art. Remember, this is often not the last frame job for your art.
Finishing the job: When putting your glass/spacer/art/backing package into your frame, (even when doing mats) don’t put any pressure at all on the backing. Even slight pressure will keep the paper and back boards from expanding and contracting freely with changes in humidity. They will still expand and contract but now they will buckle. “Rattling beats buckling”.
Additional Framing Tips for Pastels: Here are a couple of tips on framing pastels with mats. Consider cutting reverse bevels rather than the standard beveled mats. I think that the little white bevel looks terrible against most pastels. Reverse bevels will also tend to “funnel” the dust behind the mat rather than onto the bevel. You may even try spacing the mat up off your painting with strips of foam board. (See figure 6) Let the mat opening cover about 1/2 inch of the edge of your painting and make the foam board strips back about an inch from the mat opening so they won’t show. This is a nice look and the dust will go behind the mats… mostly.
An easy and very reversible alternative to hinging your art when matting is to use “See-Thru™” mounting strips or polyester photo corners, both available from Lineco, Inc. These have a pressure sensitive backing and are attached to the backing or to the back of the mat at the corners or along the sides of your art. This method is for smaller paintings.
When framing larger pieces with mats, besides the 2-3 “Suspension” hinges at the top, you’ll want 1-2 “Safety” hinges at the bottom. (See Figure 7) These should be rather loose to keep the art from buckling with changes in humidity. They will prevent the art from swinging sideways when some idiot turns your frame sideways. This move usually ends up tearing or buckling your art at the top hinges. Safety hinges prevent this common damage.
Whether you are framing matless or with mats, I would highly recommend tape sealing your glass/art/mat/backing package. Basically this means taping from the front edge of the glass back to the backside of your backing all around the glass-art-backing package.
When framing with glass, any movement front to back on either the glass or the backing creates a diaphram pump of sorts that pumps air in and out around the edges of the glass.
Murphy’s law of framing lets dust come in but not out. Tape sealing stops this pump action and also captures a lot of the little particles hiding in the edge of matboard and foam board.
top of page |