|
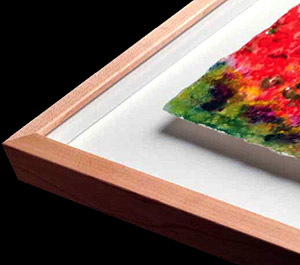
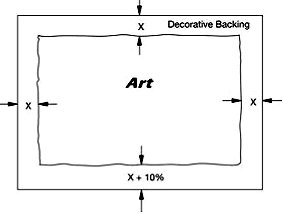
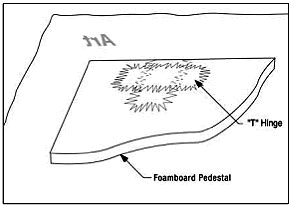
over a decorative backing without mats creates a wonderful presentation that is becoming very popular. The easiest method for floating is to hinge art to a pedestal of foamboard or mat board that is about 1" smaller all around than the watercolor itself. This will then be attached to the front of a decorative backing about 2" to 3" larger than the watercolor all around. The example here uses white linen mat board as a decorative backing with ½" wide white FrameSpace spacers and a maple stem moulding. (You could also use EconoSpace 375 for this framing effect.) The pedestal of foamboard raises the watercolor off the backing, creating a shadow that accentuates the deckled edge and shows off the beauty of the watercolor. No mats are required in this striking presentation.
1. Lay the watercolor face down on a clean surface and center the piece of foamboard or matboard on the back of the watercolor. The pedestal should be about 1" smaller all around than the watercolor so that it doesn't show.
2. Mark the back of the watercolor with light pencil lines or bits of masking tape at the edges of the foamboard where the hinges will be.
3. Remove the foamboard and paste the hinges just underneath the marks. Make sure there is ¼" space between the mark on the watercolor and where the hinge is pasted.
4. After the hinges (see Hinging below) have dried for about 15 to 20 minutes, place the foamboard back down on the watercolor and lay heavy books or other weights on it so it won't move.
5. Now fold the hinges back over the foamboard. Put one T hinge across the top center pendant hinge close to the edge of the foamboard. Put all the rest of the T's at the tips of the pendant hinges. Pull the top hinges snug before T-ing and make sure all of the safety hinges are T'd with a little slack to prevent buckling.
6. After the hinges have dried, bond the foamboard to the center of the decorative backing with several 1" diameter dollops of a flexible adhesive, such as the acrylic used for bonding paneling. Years from now, these spots of adhesive can be reversed by “sawing” with a piece of picture wire between the decorative backing and the foamboard. The T hinges can be slit on either side of the pendant hinges. Everything here is reversible.
Another method of floating watercolors uses S hinges, some times called slit hinges. This is done by cutting slits through the decorative backing and running long hinges through them. T the hinges as noted above. This method holds the watercolor flush with the decorative backing, but any buckling of the watercolor will be more apparent than with the pedestal float.
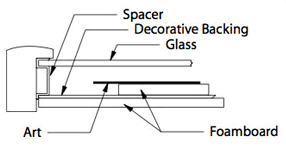
With either floating method, the next step is assembly. If you're using FrameSpace, put it all around the glass. Put the first length of FrameSpace on the glass, leaving about 3/16" space from the corners. Cut the other end flush with the edge of the glass with an anvil pruner garden shears or razor knife. Put the next piece on in a butt-joint fashion, cut flush with the edge of the glass, and so on all around the glass. To use EconoSpace, cut the top piece the same length as the glass. This will ensure that the ends are held up by the side pieces. Bond all around flush with the edge of the glass. Next, stack the glass with the spacers. Stack on top of the art and backing. Check for dust and critters before completion.
When all is clean, place the empty frame down over the art-glass-backing package. Check again for dust, turn the frame over, and put the fitting or glaziers points in. Leave these points slightly loose to allow for the free expansion and contraction of the decorative backing. If it is too tight, the backing will buckle with changes in humidity.
1. Cut four strips of matboard the width of the desired spacer. Make sure they are all exactly the same width and that the cuts are straight.
2. Bond these strips to yet another strip of foamboard (or thicker mat or mounting board) with glue because double-stick tape won't last long. This will give the glass a ledge to sit on.
3. Clean the glass, drop it into the frame rabbet, and then glue the spacer strips into the frame. Be careful not to smudge the glass as it will be very hard to clean right next to the spacer. After the glue has dried, turn the frame over and set it down onto the art/backing. Turn the whole package over and fit loosely to allow the backing to expand and contract with changes in humidity.
Hinging
In more than 35 years in the framing business, I've found that hinging artwork into a frame is the most troublesome problem facing artists and framing professionals. There are some important basic physical properties of hinging materials as well as proper methods that should be kept in mind. The biggest problems with hinging start with the use of pressure sensitive adhesive (PSA) tapes. You have probably seen lots of PSA tape failure, discoloration, and either a dried out or gummy residue on the art. Even tapes marketed with such words as “archival,” “acid-free,” “museum,” “conservation,” “removable,” and “permanent” are not as preservation-framing friendly as hinging with wheat starch paste and Japanese papers, which is why those materials are preferred by museums and conservators. This method has been used for hundreds of years because wheat starch paste creates a very strong bond that doesn't degrade with time. It is easily reversible with a dampened Q-Tip™ without damage to the art, even after decades. Hinging with wheat starch paste is very easy to do, and the results are well worth the extra effort.
Proper, strong, long lasting hinging is really easy. The hinges should be the weakest link because they should fail before the art tears. This is where handmade Japanese papers, such as rice or mulberry, come into play.
Japanese papers are available in several different thicknesses and strengths. Select the strength of paper, size of hinges, and number of hinges to correspond with the weight and size of the art. There is no special calculation for this, so try different combinations until it's right.
When hinging very light-weight Japanese-style brush paintings, for example, you'll want to use the lightest hinge paper available. With full-sheet, 400-pound watercolor paper, on the other hand, you'll want to use a much heavier hinging paper.
Japanese papers like to be “wet torn” to make feathered edges that increase the bond strength and help hide the edge of the hinge. This is especially important if the art is very thin or translucent. To wet-tear paper, wet a line with a small brush to soften the fibers, wait a bit, and then tear it. You can make nice long feathered edges by pulling and separating the paper across the wet line.
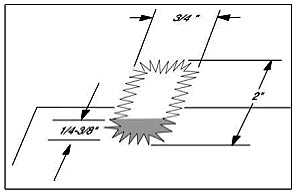
There are three basic hinge types: pendant, T, and V. For a heavy watercolor, a typical pendant hinge made from a light to medium-weight Japanese hinging paper would measure about 2" to 2½ " long and ¾" to 1" wide with wet-torn edges all around. The grain of the paper should run parrellel with the long dimension of the hinge for the most strength.
With a pendant hinge, the bonded engagement on the back of the watercolor is the last 1/4" to 3/8" of the tip of the hinge. It is bonded about 1/2" in from the edge of the art and sticks out perpendicular past the edge.
This hinge is then adhered to the backing board, although some prefer to hinge to the back of the mat. If you hinge to the backing, either hinge the mat(s) and backing together (with linen hinge tape along the long edge of the mat) or otherwise attach the mat to the backing. If you decide to use double-sided PSA tape for this step, remember that it is not permanent. A couple of dabs of white glue would be better.
For adhering to either the mat or the backing I recommend a T hinge. This is simply another strip of Japanese paper adhered across the pendant hinge to form a T. This is amply strong and facilitates easy removal of the hinge from the backing by slitting off the two legs of the T without upsetting aperfectly good hinge attachment to the watercolor.
The V hinge is folded in half like a V and attached to both the art and the backing, with or without a T. These are very weak (even with the T) and should not be used.
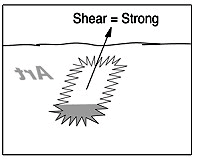
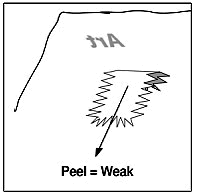
Try this quick test to see how important hinge strength is. Stick a piece of Scotch Tape® on the edge of a table and pull on the end of the tape straight out from the table. This is the “shear” mode, and it is very strong. Now fold the tape back over on itself and pull towards the center of the table. This is the “peel” mode, and it is very weak. Little rings of any tape squished between the art and the backing are in the ”peel” mode and will fail very easily. A pendant hinge is very strong because to overcome the bond you must “shear” the whole bond at once. A V hinge is set up in the “peel” mode and the bond is easily overcome. If you use V hinges at just the top of the art, any movement of the art, either up or down, will peel the hinges. This is the way most hinges fail.
If you put two or more hinges on a watercolor and T them close to the edge of the watercolor, it will most likely cause buckling between the hinges as the art expands and contracts with changes in humidity.
The simple answer is to T only one of the top (primary) hinges close to the edge of the watercolor and put the T's at the very tips of all the rest of the primary pendant hinges. This one close T will keep the watercolor aligned with the mat, left and right, while all the rest of the T’s at the top will have gravity helping to hold the art level. These long T'd pendant hinges will swing back and forth as the watercolor expands and contracts with changes in humidity. The chances of buckling between hinges is now greatly reduced.
When you have pendant hinges (shear) just at the top of a watercolor and someone picks up the frame and turns it sideways, the weight of the watercolor will swing downward and peel the hinge that is now near the bottom. This is the cause of most hinge failures, especially during shipping.
The answer to this is what I call Safety Hinges at the bottom (and sometimes even the sides) of the watercolor. These should be T'd way out at the tips of the pendant hinges with a little slack to allow for the expansion and contraction of the watercolor with changes in humidity. When the watercolor is turned sideways or upside down, all the safety hinges at the sides and bottom go into action and keep the primary top hinges from peeling.
The secret to making wheat starch paste work well without puckering watercolor paper is timing. You must learn just how long to wait from the time you apply the paste to the hinges until you apply the hinges to the art. If you apply them too soon (too wet), the art will pucker. If you wait too long, you won't get a strong bond.
Here are some tips to getting it right. Paste up six or seven trial hinges at the same time. Try to apply about the same amount of paste to the tip of each hinge. Immediately after pasting, apply the first pasted hinge to a piece of copy paper or page from a magazine. Apply the hinge gently, and blot lightly with a folded paper towel. If you blot too hard you will squish moisture out of the hinge and onto the paper, making it pucker.
Make a blotter by folding a piece of paper towel into a 2" square and put it over the hinge and weight it with a small weighted bag (filled with sand or B-B's). You'll need several weights, as each hinge must dry for about 15 to 20 minutes.
Wait two minutes and apply the next hinge, wait two minutes more and apply another hinge, and so on. Then, 20 minutes after applying the last hinge, do the pull tests.
You'll notice that the first couple of hinges were still too wet and that the paper puckered. The last couple of hinges probably got too dry and didn't stick very well if at all. So some of the middle hinges were just right. Now you know how long to wait from pasting to hinging. When you start a hinging job, set a timer because you will probably get distracted. Now try peeling the hinges that seemed strongest just to see how weak hinges are in the peel mode. Next, do a few more test hings on heavier paper and try some"shear" pull tests so that you can get a feel just how strong proper hinges can be.
top of page |